Measuring & Mixing Catalyst

Measuring & Mixing Catalyst         

Don’t take chances here!  Make sure you know the required percentage for the specific product (if in doubt, check the Technical Data Sheet in this web site), and measure carefully.  Over catalyzing can cause “burning” of the finish, causing it to amber and, over time, to become brittle and prone to cracking.  Under-catalyzing will result in a relatively soft coating that can lead to re-coating issues such as wrinkling.  It will also cause the lacquer to “gas-off” for months instead of days.

 When mixing catalyst and thinner into post-cat lacquer, add the catalyst first, then thinner as required.  Pour slowly while stirring to avoid “catalyst shock”.

Comfort Zone for Wood Finishes

Comfort Zone for Wood Finishes     

 Just as humans don’t like to be cold, so it is with wood coating materials.  The Technical Data Sheets for most finish products recommend application temperatures in the order of 18 to 20C.  Chemists tell us that “below 14C, nothing much happens with catalyzed material”.  So to get full value from your coatings, it really pays to get as close to ideal conditions as you can.  Easier said than done in many situations!  And remember, temperature applies not only to the coating material, but also to the substrate and the ambient air temperature.  Material that is stored in un-heated locations can take a long time to get up to temperature-this particularly applies to containers of finish that are stored on concrete slab floors.  So when you find yourself complaining about the cold this winter, give a thought to your finishing materials; they are probably feeling the cold as much as you are!

Meet the COLUMBIA INDUSTRIAL Colour Match Team
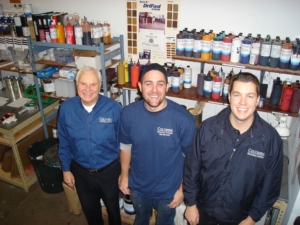
Meet the COLUMBIA INDUSTRIAL Colour Match Team


                       MIKE       TREVOR        JOSH


We Match Stains: To Columbia Wiping Stains, Becker Acroma’s Arti® Spray & Wipe                  

                                Alcohol Stains, Aqua Chroma® Water Based Stains, Microtoners,     

                                  Glazes & Tinctures. 

We Match Paint:  To Becker Acroma’s pigmented enamels:  Matador® and Strong® .

 Matching colours is tricky!

Think of it for a moment; there is, in theory, an almost infinite number of colours, shades, tones etc.  While basic colour theory can be helpful, it can only take you so far.  Industrial pigments and dyes don’t come in “basic” colours, but instead we work with such exotically named pigments as “burnt umber” and “red oxide” all of which are variations of prime colours.

 How do we do it?

This is where patience and experience are key.  While the process may appear to be simple, just adding a little of this and a little of that, in reality, colour matching can be challenging. Unlike retail paint stores who use a volume-based approach (those familiar cylindrical pigment dispensing machines), we weigh all our pigments and dyes to an accuracy of 1/100th of a gram.  This ensures that we can accurately replicate any of our colour matches. When developing an initial colour match, we record the weights in our computer files.  The resulting “formula” then becomes part of our colour data base that includes literally thousands of colours.

 What do I need to supply?

For stain matches, it is essential that we work with an actual sample of the wood that is to be stained as the chemical composition of wood can have a marked effect on the resulting colour of a given stain. Please give us a sample of the “target  colour”  and some pieces of the wood that you will be staining.

 For paint matches, a sample of the actual paint or the paint manufacturer’s colour reference number and name. For example: Benjamin Moore HC- 27 “Monterey White” or Cloverdale 7300 “Jet Stream” or M.L. Campbell 1115 “Quartz Moon”. Occasionally, paint companies change their fan decks and/or their referencing numbers.  It is important to keep fan decks current-or if in doubt, check with us first. Lighting can have a major impact on the viewer’s perception of colour.  The more pigments and dyes in paint, the more impact varying light will have on the apparent colour so let us know what the application will be.

 How long will my match take?

There are several factors that determine our “turn-around time” for a colour preparation.  If it just involves mixing to an existing formula (either a stain or a paint), then orders received before 11:00 AM can be completed on the same day.  On the other hand, if we need to match to a sample of stain or paint, every case is different.  Some matches can be done quite quickly, while others can require many iterations before we are satisfied with the result.  And then there is the work load factor, which we can’t predict from day to day. While we can usually get a match done within a couple of days – (sometimes sooner; sometimes a bit longer), the bottom line is that we pledge to do our very best – all the time.

 How much will it cost?

No charge for Becker Acroma lacquer customers. If you are outside the Victoria area you’ll need to cover the courier costs unless one of us is in your area and can pick-up your sample. If you are not a lacquer customer a nominal colour match charge plus material costs may be applied for a one litre minimum size sample. 

 Open 7:30 – 4:30 Monday – Friday, 8:00 – Noon Saturdays

Colour Matching – Why Patience is Paramount!

Colour Matching – Why Patience is Paramount        [18.10.10]


  • Beware-colour matching can drive you crazy!
  • What we ask of our customers (besides patience!) is to provide a good sample of the colour they would like to match; if stain, then a reasonable supply of the actual wood that is to be stained.
  • Why matching colours is tricky- think of it for a moment; there is, in theory, an almost infinite number of colours, shades, tones etc.  While basic colour theory can be helpful, it can only take you so far.  Industrial pigments and dyes don’t come in “basic” colours, but instead we work with such exotically named pigments as “burnt umber” and  “red oxide” all of which are variations of prime colours.
  • How do we do it?  This is where patience and experience are key.  While the process appears to be simple, just adding a little of this and a little of that, in reality the process can become quite comlex.   Unlike retail paint stores who use a volume-based approach (those familiar cylindrical pigment dispensing machines), we weigh all our pigments and dyes to an accuracy of 1/100th of a gram.  This ensures that we can accurately replicate a given formula in the future.  When developing an initial colour match, we record the weights in our computer files.  The resulting “formula” then becomes part of our colour data base that includes literally thousands of colours.
  • What can go wrong?  Barring mixing errors (we double check everything but we are human!):
    • For stain matches, it is essential that we work with an actual sample of the wood that is to be stained as the chemical composition of wood can have a marked effect on the resulting colour of a given stain.
    • The dependability of the colour sample itself.  Occasionally, paint companies change their fan decks and their referencing numbers.  It is important to keep fan decks current-or if in doubt, check with us first.
    • Lighting can have a major impact on the viewer’s perception of colour.  The more pigments and dyes in paint, the more impact varying light will have on the apparent colour.
    • And above all, please remember to check the colour of any paint of stain before proceeding with the main application.

Caring for Your Spray Gun

Caring for Your Spray Gun               [18.10.10]


(From DeVilbiss Service Bulletin SB-2-001-F)

Cleaning, basic maintenance and lubrication


Remove the air cap from the gun and immerse it in clean solvent.  Blow it dry with compressed air. If the small holes become clogged, soak the cap in clean solvent.  If reaming the hole is necessary use a toothpick or some other soft implement.  Do not clean holes with a wire or similar hard object, as permanent damage can be done resulting in a defective spray pattern.

Cleaning a Suction or Pressure Feed System

Turn off the air to the gun, loosen the cup cover and remove the fluid tube. Holding the tube over the top of the cup, pull the trigger to allow the paint to drain back into the cup.  Empty the cup and wash it with clean solvent and a clean cloth.  Clean off the outside of the tube.  Fill halfway with clean solvent and spray it through the gun to flush out the fluid passages.  Then remove the air cap and clean it as previously explained before replacing it. Wipe off the gun with a solvent-soaked cloth, or if necessary, brush the air cap and gun with a fibre brush using clean-up liquid or thinner.

Cleaning a Pressure Feed Gun With Remote Cup or Tank

Turn off the air supply to the cup or tank.  Release material pressure from the system by opening the relief valve.  Material in hoses may be blown back.   The lid must be loose and all air pressure off.  Keep the gun higher than the container, loosen the air cap approximately 2-3 turns, hold a rag over the air cap, and trigger the gun until atomizing air forces all material back into the pressure vessel.

Back-flush the hose into the cup or tank with solvent and dry compressed air.  Clean the container and add clean solvent. Pressurize the system and run the solvent through until clean.  Atomizing air should be turned off during this procedure.

Clean the air cap, fluid top and tank.  Reassemble the system.

Note:  Never soak the entire gun in cleaning solvent.  This will dry out the packing and remove lubrication.

Lubrication

Lubricate (daily) the fluid needle packing, the air valve packing, the trigger bearing screw and the adjusting screw threads with spray gun lube.  The fluid needle spring should be lightly coated with petroleum jelly.  Thoroughly clean the air cap and baffle threads and lubricate with spray gun lube. Lubricate each of these points after every cleaning.


Parts replacement


Always refer to the exploded view of your gun.

Pull trigger or remove fluid adjusting screw prior to tightening the tip to avoid damaging both the tip and the needle. Spray guns have some combination of plastic, copper, leather and soft packings and gaskets.  It is recommended that these be replaced if the assembly is removed or when dong an overall repair. The fluid needle packing must be replaced when the packing nut bottoms out. New packing or needle should be oiled before assembly.  Packing nuts should be tightened just enough to seal.  Too tight will bind the needle as well as shorten the life of the packing. When replacing the fluid tip or fluid needle, it is recommended that they both be replaced at the same time.

Please let us know if Columbia Industrial Supplies can answer any questions you may have or if you would like further information about the paint spraying equipment we stock.